Search This Blog

Monday, May 31, 2010

Preparing cake for fondant

Find recipe at Make it and Love it


Baking A Better Cake
When I bake for my clients and my family I use a cake mix. I do that for a few reasons. They are cheap ($.88-$1.25), it saves me time (no measuring), they come in a ton of flavors, and I can add to them to make them better.
When I set out to improve on the standard cake mix I wanted to get a better cake without adding cost. Here are a few things I do to make the standard cake mix much better and easy to use for cake decorating.
  1. Add more oil. Most mixes say to use 1/3 cup oil. I always add 1/2 cup. This makes the cake more moist. (If the cake mix already uses 1/2 cup I do not add more).
  2. Eggs. Set your eggs out on the counter to get them room temperature. Or warm them up in dish of warm water (not hot) for 5 minuets before you mix them in. I also always crack my eggs in a separate dish. This way if you have a shell drop into the dish you can see it and get it out.
  3. Don't over mix. When you mix all the ingredient together just mix to combine. The cake mix instructions tell you to mix for 2 minuets, this is not good advise. Use a whisk and stir until the wet and dry ingredient are combine. There should still be some small lumps, that's OK. Why? The more you mix the tougher and drier your cake will be.
  4. Always grease and flour your pan. It's important to do this and not use cooking spray. Using cooking spray leaves you with a surface that will crumble when you try to buttercream the cake. I use a thin layer of Crisco to coat the pan and then I lightly dust it with flour.
  5. Watch your baking time. When you put your cake into the preheated oven set your timer to the lowest time on the box. Example: If the box says 30-35 minuets set the timer to 30 minuets. Check it at 30 minutes and watch carefully until it's done. I don't use the toothpick method of checking the cake. I watch and see for when the center "sets." When you touch a cake in the oven (with a oven mitt on) it will wiggle in the middle. When the cake is done it will not wiggle anymore, the middle will be firm. If you are more comfortable with the toothpick method it's fine to use, this is just what I do. I also try to trust my nose. When the house has the wonderful baking cake smell, you are close to done.
  6. Freeze the cake. After you bake and cool the cake on a cooling rack, wrap it tight in Saran wrap. Put it in the freezer for 24 hours. Frozen cake is really easy to buttercream and stack. This does not affect the cakes taste, it even makes the cake taste more moist. Freezing cake can also save you time. You can bake the cakes ahead of time. I sometimes have frozen cakes up to a week with great results. I have read you can freeze cake up to a month but I want to make sure I have excellent product so I don't push it more that. Just make sure your Saran wrap it tight.
    Stacking and Icing the Cake
    My cakes are 2-3 layers under the fondant. After you bake a cake it will have a bit of a dome on the top. You need to level the top in order for your cake to stack properly. I use a serrated bread knife and just eyeball it as I cut the top off. You can also buy a cake leveler at Michael's, or another store with cake supplies.
    Level each of your cake layers.


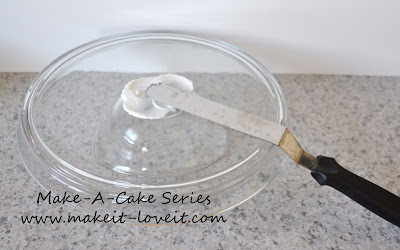
Take a small amount of buttercream and and spread it in the middle of your cake plate to secure your cake. This will keep it from sliding when you move it.
The spatula in the picture is key. It's an icing spatula and is an essential part to cake decorating.


Turn your cake over so the top (the cut side) is on the cake plate.
Distribute a layer of buttercream onto your cake and spread it evenly.


Turn over your second layer and place it on top of the first.
Take buttercream and spread it over the top of the cake.
Push some buttercream over the side to start icing.


Change the direction of the spatula and spread the buttercream over the sides.
Spin the cake stand around to get the whole cake.
Make sure to get it in the crack between the two layers.


Make the layer of buttercream thin. This is called the crumb coat. Let this sit for 10-20 minuets.


Then go back with more icing and put on a thicker layer.
Doing this keeps any crumb from being on the outside of the cake.
You do not see this when you cover with fondant but if you are just buttercreaming a cake, this step is helpful.


Spread the icing nice and smooth on top.


Now your cake is ready for fondant!


I hope this information wasn't too long.
I hope you received some tips that will make cake decorating fun for you!

Homemade fondant

I found this at Make it and Love it


Homemade Marshmallow Fondant vs Traditional Fondant (found in stores):

- Marshmallow fondant tastes better than store bought fondant.
- Marshmallow fondant is cheaper: $4.00 a batch vs. $15-25 for traditional fondant.
- Store bought is, however, a bit easier to work with.


One thing I must start with is that I cannot take credit for this marshmallow fondant recipe or how to make marshmallow fondant.
When I first started cake decorating I looked up how to make marshmallow fondant and found that most of the recipes/process were very similar.

Here is the exact recipe I used.

I added pictures below to show you the steps that I take.
I hope this is helpful, but know that this is not my own information.

Supplies:

If you want to know how much you need to cover your cake, check out the Wilton site.
(This recipe will make about 3 lbs of fondant.)
  1. Two pound bag of powdered sugar **
  2. 16 oz bag of mini marshmallows **
  3. 1/2 cup shorting (Crisco brand)-- put this in a container you can get your fingers into....like the measuring cup shown above.
  4. 2-4 Tablespoons of water
**Don't buy the "off brand" of these products. Trust me, I have tried all different combinations to be able to use the generic brand and it just doesn't work. You will end up frustrated like I was....trust me on this one! Ha!


Let's get started...

Clean your counter really well and spread 1/2 of your shorting in a thick layer on your counter about the size of a basketball.

Sift your powder sugar into a pile on top of the shorting. I hate sifting when I bake but in this case it is really helpful. If you don't do it you will end up with clumps of sugar in your fondant.

Make a crater in the middle of your sugar, keeping high sides all around and a layer of powder sugar on the bottom.


Place your marshmallows in a microwave safe bowl. Add your water. Start with 2 tablespoons.

**The amount of water you use will depend on where you live. When I lived in southeastern Idaho (where it's more dry) I would add 3 1/2 tablespoons but now that I am in northern Idaho, I only add 2.
If your fondant is dry (cracking) when you knead it later on, you know you need to add more water. Once you figure out how much you need you can add it during this step.

Put your bowl in the microwave. Heat until your marshmallows melt. This takes about 2 1/2-4 minutes. They will look like this:


Fold the marshmallows until it is all incorporated and smooth.


Pour your mixture onto your powdered sugar crater, making sure to scrape and add the excess from the sides of the bowl.

These next steps can be hot, please be careful.
You can let the marshmallows cool a bit if needed.


Coat your hands with shortening. On the front, back, in between fingers, up to your wrists, everywhere. Ha! That which it's not coated will have fondant stuck to it. So take off your rings too.

And I am sure there are many ways to do this.....but this is what works for me.
Start to fold the powdered sugar on top of the marshmallows....


...and keep folding and combining it until it all starts mixing together.


It will start to look like this.


Now I scrape the counter with a pastry scraper or spatula, put the extra sugar on the fondant.
Apply a thin layer of shortening onto the counter to prevent sticking and keep kneading the fondant.


Keep going until everything is worked in and smooth. If it doesn't get smooth right away just keep kneading.
** If you still have some shortening left, work all but 1 tablespoon in.


Now you're done.
Use the fondant right away or coat your finished fondant with a thin layer of shortening and seal tight in a zip lock bag.

This can be left out for a few days without a problem or for several weeks in the refrigerator.

Keep in mind that making your fondant ahead of time is a real timer saver.

......................................................................


Onto coloring your fondant.
Fondant is available at the stores already colored or in white.

When you color it yourself there are benefits:
  • it's cheaper
  • you have many more color options
  • you can match any shade you want.


To color your fondant, you will need:
- White fondant
- Gel paste dye -- I have used the Wilton brand available at Michael's and I like it. Now I use AmeriColor gel paste only because I like the squeeze bottle. I buy that brand from Amazon.com.
- Food safe gloves (optional)-- the food color will stain your hands for a day if you do not wear gloves.


For this batch I needed an aqua color for a cake I was making. I knew I needed a mix of teal and sky blue.
It's best to use a small amount of color at first and get darker of you need.

First, warm up your fondant in the microwave (just a little) to make it easier to knead.

Then, add a few drops of color to a few different areas of the fondant. This will help it mix in faster.

**Note--if you are coloring your fondant a dark color, like red or black, plan on using a lot of dye. It takes large amounts to get true dark colors.


Knead the fondant until all the color is mixed in. Make sure there are no streaks.


After I mixed in the color, I still needed my fondant to be a shade darker.


So, I added a few more drops of color at a time and kneaded again. Perfect.

And that's it.

Now you're ready to make beautiful edible creations!


Wondering how to use your new fondant?
If you haven't already, make sure and check out the cake preparation tutorial here and the covering your cake with fondant tutorial here.


I hope these steps will make you even more brave to jump into fondant work.
Happy Decorating!

Wednesday, May 12, 2010

Another Olive Garden Breadsticks

Ingredients

* 1 loaf frozen bread dough, thawed
* light olive oil flavored cooking spray or other vegetable oil cooking spray
* 2 teaspoons garlic powder (not garlic salt, or more)
* 2 teaspoons dried oregano, rubbed into a fine powder

Directions

1.
1
Preheat oven to 375 degrees F.
2.
2
Spray your fingers with a bit of oil and knead the thawed bread dough.
3.
3
Shape the dough 10 cigar sized pieces.
4.
4
Place the breadsticks on a oil sprayed cookie sheet.
5.
5
Let rise in a warm place until doubled in size (up to 2 hours).
6.
6
Lightly spray the top of each breadstick with oil and dust with the garlic powder and Oregano Bake 20-25 minutes or until golden brown.
7.
7
Cool slightly& serve.

Olive Garden Breadsticks

For the Dough:

1 pkg active dry yeast
4 1/4 cups all purpose flour-plus more for dusting
2 tbsp Un-salted butter softened
2 tbsp sugar
1 tbsp fine salt

For the topping:
3 tbsp melted butter-Unsalted
1/2 tsp kosher salt
1/8-1/4 tsp garlic powder
pinch of dried oregano

1. Place 1/4 cup warm water in the bowl of a mixer, sprinkle in the yeast and ste aside until foamy. About 5 min. Add the four, butter, sugar, fine salt, and 1 1/4 cups plus 2 tbsp warm water. Mix with paddle attachment until a slightly sticky batter forms. 5 min.

2. Knead the dough by hand on a floured surface until very smooth and soft, about 3 min. Roll into a 2 foot long log, cut into 16 1 1/2 in long pieces. Knead each peace slightly and shape into a 7 in ong bread stick. Arrange 2 inches apart on a parchment lined baking sheet. Cover with a cloth, let rise until almost doubled (45 min).

3. Preheat oven to 400, and brush the bread sticks with 1/2 the melted butter then sprinkle with 1/4 tsp kosher salt. Bake until lightly golden (about 15 min), meanwhile mix the remaining salt with the garlic powder, and oregano. When you take the bread sticks out of the oven brush with remaining melted butter and "seasoned salt".

Olive Garden Alfredo Sauce

Ingredients
1 1/2 cup milk
1 1/2 cup heavy cream
1/2 cup imported Parmesan cheese, grated
1/2 cup imported Romano cheese, grated
6 egg yolks from fresh jumbo eggs
Salt and black pepper to taste
Procedures
  1. HEAT milk and cream in a heavy bottom saucepan until it begins to simmer. Turn off heat. Slowly whip in cheese, then remove from heat.
  2. PLACE egg yolks in a separate bowl and slowly whip in a portion of the hot milk and cream mixture. Slowly add egg yolk mixture back into remaining cream mixture. Place back on very low heat and continually stir until simmering. Take sauce off heat so it thickens. (This will increase temperature of egg yolks, known as tempering).
  3. SEASON to taste with salt and black pepper. Serve over your favorite pasta.